The crochet poinsettia flowers look adorable anywhere. But, they become special at year-end holidays, as these crochet flowers give a magic touch to your home.
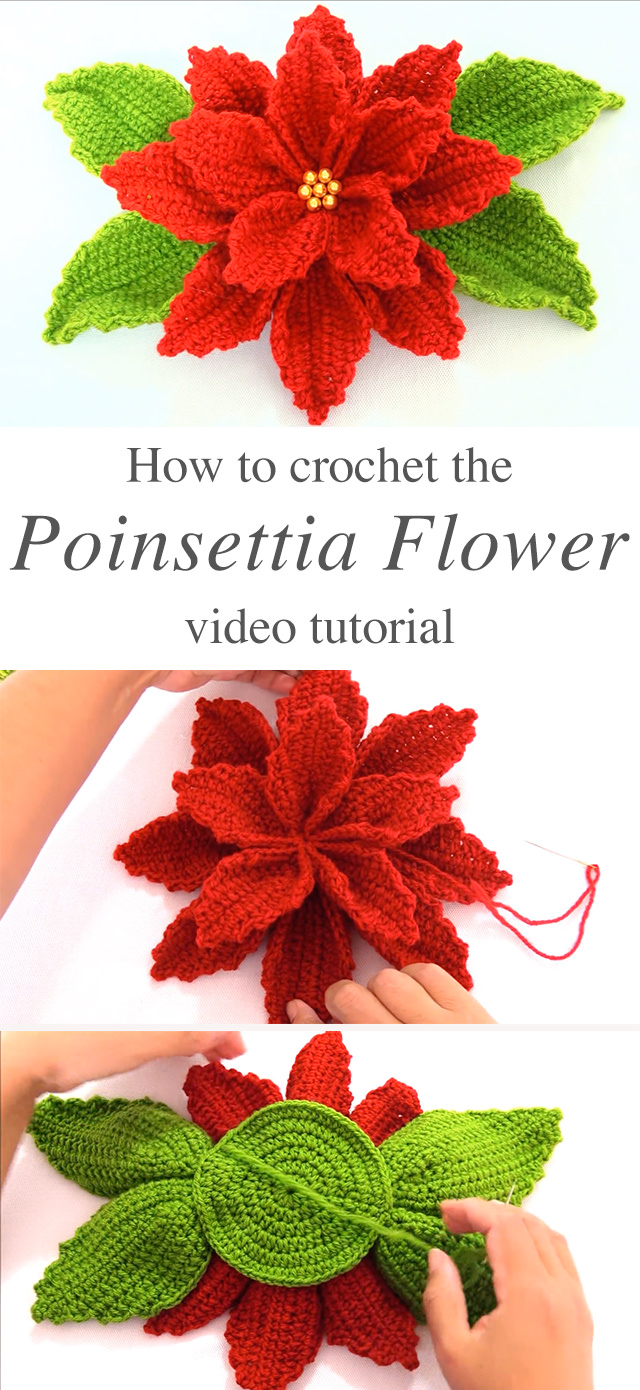
This poinsettia flower can be a lovely addition to crochet wearables, bags, tree ornaments, pillow decorations, hair accessories and you can also use it as home decor.
Related Posts
It could be the ideal gift for your lovers or an ornament by simply threading a loop through one of the leaves, or you could use this crochet flower to decorate for the holiday season.
Just start making some of these lovely poinsettia flower. The video tutorial will walk you through the steps so that you can make a crochet flower easily.
Enjoy it and comment below if you have any question!
Thank you for sharing my patterns and video tutorials. You are helping me posting new patterns and content that I make with much love. Follow CrochetBeja on your favorite social media sites: Facebook, Pinterest, G+ and subscribe for the Newsletter so you don’t miss a thing!
Do not distribute my patterns and video tutorials as your own. Please, link to this page if you repost them.
Source of poinsettia crochet flower:tallermanualperu
Sharron L Knutsen
I want a written pattern. Why can’t we have one?
Diana R Daniel
I’ve translated & posted below 🙂
Kay
How do I access the written instructions for your patterns. It’s very frustrating to see a beautiful crochet or knit project and not be able to have the pattern.
Mary
Would like a written English pattern for pointsettia
Hendrien
Yes please I would like a written English pattern for poinsettia.
M. Mascaro
i agree with everyone else who made a comment about the fact that there is no written pattern in English. I would love one. Please make one available.
Sarah
Don’t you love it when the page with the pictures are in English so you think you will find English directions and then the directions are in a video that speaks Spanish!! Talk about click and bait.
Sharon
Would like a written pattern in English please!
Margaret Olsen
Please do a English-language THANK you
Ann
Instructions in English please and written instructions. Thankyou
Julie Ann Scovern
Gosh I keep chasing these pins just to a pattern, it says free, and I really would like a written in English Pattern
Thanks
jackie pudvay
I think after all these comments asking for a written english pattern we should get one even if it’s a paid pattern I’ve been looking for it for a couple years or more with no luck really bummed
Frances E Carter
I would like to know why should any of us that only speak ENGLISH should join this site. You do not give us away to get the video in ENGLISH. I want to do these patterns but I can not make sure I’m doing it correct because I do not know what this lady is saying or what she wrote out on that paper. PLEASE PLEASE PLEASE PLEASE DO SOMETHING ABOUT THIS PROBLEM!!!!!!!!!!!
Betsy Duttry
I sure would like to make this beautiful pattern. It looks like there are a few of us that would. I would certainly pay for it. Wish there was a way to convert to English. Please, please, please. Thank you
Geneva Kennedy
I I am so disappointed that I cannot find a written pattern for your poinsettia and leaves. Please could you write some of your patterns in English for those of us who need a pattern? Thanking you in advance. Geneva Kennedy in Oklahoma, USA
Miss Mahtab
It’s an attractive idea for crocheters who love to crochet. When I see this I feel happy. this is so beautiful. really it’s so creative and useful for everyone. Thanks for the helpful ideas.
Renee Goumas
Ditto. I would love to have English subtitles so I may follow along. She speaks very fast and I only get every other word. Is this possible? Please get back to me asap. Thank you.
Miss Mahtab
Amazing crochet design. so useful with creative thoughts. I like it very much. you give a unique idea to crochet lovers. who love to crochet they should try this.thanks for the helpful idea.
Lee
My Spanish is only asi asi but after watching your video a few times I was able to figure out how to make this incredible flower. I’m so sorry that your post is littered with people demanding you write this pattern up in English. English isn’t the only language in the world and these comments are just down right rude. Thank you for making this available, I can’t wait to put it on a Christmas wreath for my front door! Gracias!
Diana R Daniel
Who knew I’d use my Spanish Minor in college for this?! But I loved this so HAD to make one for my mom.
Materials: Red yarn, green yarn, red thread, 7 gold beads 3mm hook (I used 3.125mm) needle, yarn needle.
Make 8 large petals, 5 small petals (both have 9 points including tip)
Make 2 large leaves, 2 small leaves (both have 13 points including tip)
Start:
Large Petal-Chain 16
OR Small Petal-Chain 12
OR Large Leaf-chain 21,
OR Small Leaf-chain 18
SC in BLO in the 2nd st from the hook (creates 1st tip point), sc x 2, hdc along until there are 2 st left in row, sc x 2, then in the same last st, add 4 more sc (add st marker in 2nd sc of 4-this becomes your Center st).
Continuing around (& over the tail to weave it in), sc (both loops) x2, hdc along until there are 2 st left in row (last st is hard to see at very end).
Turn work (bring left end forward). (creates 2nd point) Sl st in 2nd st from the hook, sl st in next st. in the same st as last sl st, hdc (creates 3rd point) and hdc along until there are 3 st between the Center st and your last hdc, sc x 3
Remove st marker & make 4sc in center st, inserting the st marker in the 2nd sc
Continuing around, sc x2, hdc along until there are 2 st left in row (check that the turning point is even with the point on the other side of the petal/leaf)
Turn work (bring left end forward). (creates 4th point) Sl st in 2nd st from the hook, sl st in next st. in the same st as last sl st, hdc (creates 5th point) and hdc along until there is only 1 st between the Center st and your last hdc, sc x 1
Remove st marker & make 4sc in center st, inserting the st marker in the 2nd sc
Continuing around, sc x2, hdc along until there are 2 st left in row
Turn work (bring left end forward). (creates 6th point) Sl st in 2nd st from the hook, sl st in next st. in the same st as last sl st, hdc (creates 7th point) and hdc along until there are 3 st between the Center st and your last hdc, sc x 3
Remove st marker & make 4sc in center st, inserting the st marker in the 2nd sc
Continuing around, sc x2, hdc along until there are 2 st left in row (check that the turning point is even with the point on the other side of the petal/leaf)
Turn work (bring left end forward). (creates 8th point) Sl st in 2nd st from hook, st, sl st in next st. in the same st as last sl st, hdc (creates 9th point) and hdc along until there are 3 st between the Center st and your last hdc, sc x 3. Continue pattern below for Leaves. SKIP TO END for PETALS
Remove st marker & make 4sc in center st, inserting the st marker in the 2nd sc.
Continuing around, sc x2, hdc along until there are 2 st left in row
Turn work (bring left end forward). (creates 10th point) Sl st in 2nd st from hook, st, sl st in next st. in the same st as last sl st, hdc (creates 11th point) and hdc along until there are 3 st between the Center st and your last hdc, sc x 3.
Remove st marker & make 4sc in center st, inserting the st marker in the 2nd sc.
Continuing around, sc x2, hdc along until there are 2 st left in row (check that the turning point is even with the point on the other side of the petal/leaf)
Turn work (bring left end forward). (creates 12th point) Sl st in 2nd st from hook, st, sl st in next st. in the same st as last sl st, hdc (creates 13th point) and hdc along until there are 3 st between the Center st and your last hdc, sc x 3.
END:
Remove st marker & make sl st in last center st. Leave a 7” tail & cut
Fold petal, sl st toward tip through both sides x3, finish off & pull end down through fold.
Large Petals Small Petals
Large Leaves Small Leaves
Circle:
Make a magic circle, ch2 & put a st marker in 2nd ch. (counts as 1st hdc)
Hdc x10. Tighten ring. sl st in both loops in top of 1st ch2. (11 st)
Ch 2 & put a st marker in 2nd ch. hdc in same st as sl st. 2hdc in each st around. Sl st in top of 1st ch2. (22)
Ch 2 & put a st marker in 2nd ch. hdc in same st as sl st. (hdc, 2hdc)* around (33)
Ch 2 & put a st marker in 2nd ch. (hdc, 2hdc, hdc)* around (44)
Ch 2 & put a st marker in 2nd ch. hdc in same st as sl st. (hdc, hdc, hdc, 2hdc)* around (55)
Ch 2 & put a st marker in 2nd ch. (hdc, hdc, 2hdc, hdc, hdc)* around (66)
Assembly:
1. String 8 large petals together near the tips & make small knot. Continue and string 5 small petals together near the tips & make a small knot. String around again through small petals, then down & around through large petals. Assure correct position of petals- 1 of 8 points at ’12 o’clock’ and 1 of 5 points also at ’12 o’clock’, and stitch up & down near center to secure.
2. Using red thread, sew 1 gold bead into the center going up & down through, then sew on 6 more around it.
3. Using red thread, put a few stitches 1” out from center to hold each petal to next petal around, repeat around lower petals, too.
4. With green yarn, securely sew a large and small leaf together, x2. Lay leaf pair over sl st line on circle with large leave above, small leaf below, and lining up with the outer edge of the 3 row in the circle and sew securely. Mirror the 2nd pair & sew. Place flower with large & small point at 12 o’clock & sew with green yarn from bottom around the circle & just through each of the large red petals so it doesn’t show, but holds securely.
Wanda F
Thank you! I love this pattern. You are very generous to share your skill.
loretta
Thankyou have loved this poinsettia
Mary
Thank you, thank you, thank you. I have loved this pattern for awhile now but at 71 yeaars young I don’t see me learning a new language, so thanks for a translation and thank you tallermanpuru. I respect all people and all languages. I just never learned any other than English ( southern english… Ha ha. ) . Thanks to you for taking spanish class. Mary