Easter is a time for bright colors, sweet treats, and of course, bunnies galore. And what better way to bring handmade charm into the season than with a cheerful crochet Easter egg—with a twist!

What is a Crochet Easter Egg Bunny?
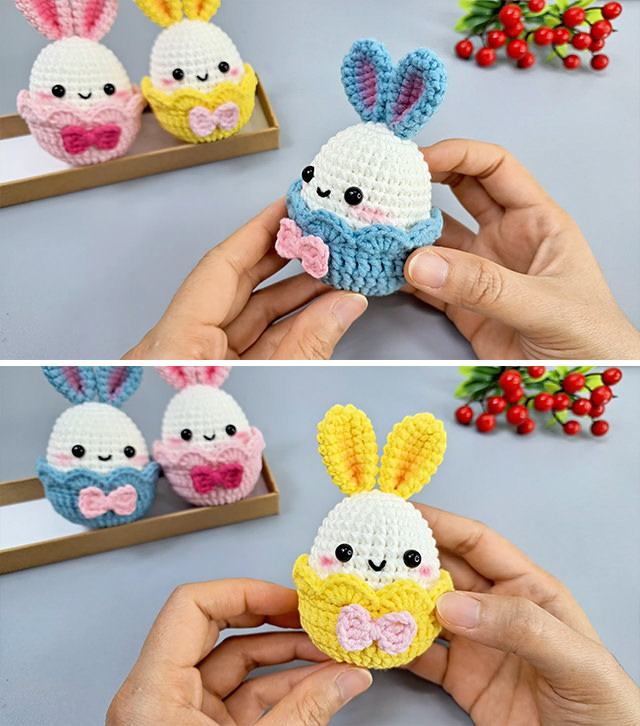
Imagine the iconic Easter egg—but with a whole lot more personality. These crochet Easter eggs take the classic egg shape and transform it into a sweet bunny with floppy ears, a cheerful face, and a scalloped eggshell “cup” that cradles the body. Think amigurumi meets holiday cheer. They make for charming springtime decor, basket fillers, or even pocket-sized pals for kids. Each bunny egg is worked up using basic crochet stitches, a few rounds of shaping, and a pop of embellishment like rosy cheeks or a tiny bow tie. With a little yarn and a touch of creativity, you’ll bring this playful project to life in no time.
Flowers Related Posts:
Related Posts
These delightful little bunny eggs are the perfect combination of cute and crafty. With their cheerful faces, oversized ears, and soft pastel shells, they’ll hop right into your heart. Whether you’re looking to create a unique decoration for your Easter table or a sweet handmade gift for little hands, this bunny egg project is both beginner-friendly and oh-so-rewarding.

Materials You’ll Need
To crochet your charming Easter bunny egg, you’ll need a few essential supplies: cotton or acrylic yarn in white, pink, blue, yellow, and additional accent colors for details like bows and blush; a 2.75mm crochet hook, depending on your yarn weight; black safety eyes (6mm or 8mm are ideal); stuffing fiberfill for shaping the body; embroidery thread for stitching the mouth and cheeks; a yarn needle for sewing pieces together; a pair of sharp scissors; and optional stitch markers to help keep your rounds on track. Choosing pastel yarn shades will give your bunny a soft, festive Easter feel, but don’t hesitate to get creative with bold or whimsical colors to make your project truly one-of-a-kind.
Get lovely tutorials daily!
Subscribe Now
to receive daily crochet and knit tutorials.
The Crochet Easter Egg Bunny Pattern Breakdown
Let’s break this down into fun, manageable steps based on the video tutorial below.
🥚 1. Crochet the Egg Body
Begin with a magic ring and work your way up in continuous rounds. This forms the base of your crochet Easter egg bunny.
- Rounds 1–6: Increase steadily to get that nice oval egg shape.
- Rounds 7–15: Continue with even single crochets to build the bulk of the egg.
- Begin decreasing after that to close the top, leaving a small opening for stuffing.
Once you’re satisfied with the shape, stuff your bunny egg firmly but gently. You want it plump, not bursting. Sew the top closed with a neat finish.
🐰 2. Craft the Bunny Ears
Now, let’s add those iconic ears that give your egg its bunny charm.
- Create two identical ear pieces, starting with a magic ring.
- Use gentle increases and then maintain a consistent stitch count for a few rows.
- Slight decreases at the top will give the ear that cute, tapered finish.
Fold each ear slightly and sew to the top of the egg with the pink side facing forward for that soft, inner-ear look. The contrast adds dimension and irresistible cuteness.
😊 3. Add the Face Details
Here’s where the personality shines.
- Eyes: Insert your safety eyes just below where the ears attach. Aim for symmetry.
- Cheeks: Use pink yarn or blush embroidery to dab on soft little cheeks.
- Mouth: With black embroidery thread, stitch a sweet, tiny smile. A slight curve adds a joyful expression.
These little touches make all the difference. Don’t be afraid to play around with expressions—sleepy, surprised, or even winking bunnies are all delightful variations!
🧺 4. Crochet the Eggshell Holder
The bunny nestles inside a frilly half-shell that mimics a cracked egg.
- Start with a magic ring and increase in rounds to form a shallow cup.
- Add a row of scallops or picot stitches to mimic cracked edges.
- Optional: Add a bow in the front center for a festive finish.
Use a contrasting pastel color to make your bunny pop. The shell also acts as a base, helping your bunny egg sit upright when displayed.
🎀 5. Embellishments: Bows, Buttons & More
Now it’s time to dress up your bunny egg like it’s ready for the spring parade.
- Mini Bows: You can crochet tiny bows or use ribbon scraps. Hot glue or sew them in place.
- Flowers: Embroidered or crocheted flowers on the shell add floral flair.
- Name Tags: Stitch or write names on mini tags for a personalized gift idea.
Let your imagination bloom. These details elevate your bunny from simple to spectacular.
Creative Ways to Use Crochet Easter Eggs
You’ve got your bunny—now what? Here are a few charming ideas:
- Easter Basket Stuffers: Tuck one into every child’s basket.
- Table Centerpieces: Group several in a basket with faux grass or moss.
- Spring Garland: String them together for a pastel bunny bunting.
- Party Favors: Perfect for Easter brunches or spring baby showers.
They also make heartwarming gifts for teachers, neighbors, or anyone who appreciates a handmade touch.
Tips for Success
- Use a stitch marker to track rounds—especially helpful when working in continuous spirals.
- Keep your tension consistent for smooth shaping.
- Embellish before final assembly—it’s easier to add eyes and mouths before stuffing.
- Mix and match colors for variety. A rainbow of bunny eggs looks stunning together.
This crochet Easter egg bunny is more than just a seasonal decoration—it’s a joyful project packed with character, charm, and the satisfaction of handmade creativity. Whether you’re a beginner testing the waters of amigurumi or a seasoned hook-wielder, this pattern is approachable, quick, and irresistibly fun.
So grab your yarn, put on some spring tunes, and stitch up a basketful of bunny joy. Easter has never been this adorable—or this handmade.
Follow CrochetBeja on your favorite social media sites: Facebook, Pinterest, Youtube , Instagram and subscribe for the Newsletter so you don’t miss a thing!
Tutorial and photos of this crochet easter egg by: Tata Crochet Patterns.


Leave a Reply