When summer whispers its arrival, few wardrobe pieces speak the language of sunshine better than a handmade crochet halter top.
THE CROCHET HALTER TOP
In a world of fast fashion and cookie-cutter clothes, there’s something soul-satisfying about wearing a piece made by your own hands. A crochet halter top is more than a garment—it’s a creative expression, a love letter to the art of slow fashion. Lightweight, breathable, and oozing with vintage charm, this retro-inspired staple has reclaimed its throne in today’s boho and beach fashion circles.
Tops Related Posts:
Related Posts
If you’re a yarn lover or simply someone with an itch to create something beautiful, this step-by-step guide will unravel the secrets to making your very own crochet halter top — inspired by the vibrant design from the tutorial below.

Choosing the Right Yarn and Color Palette
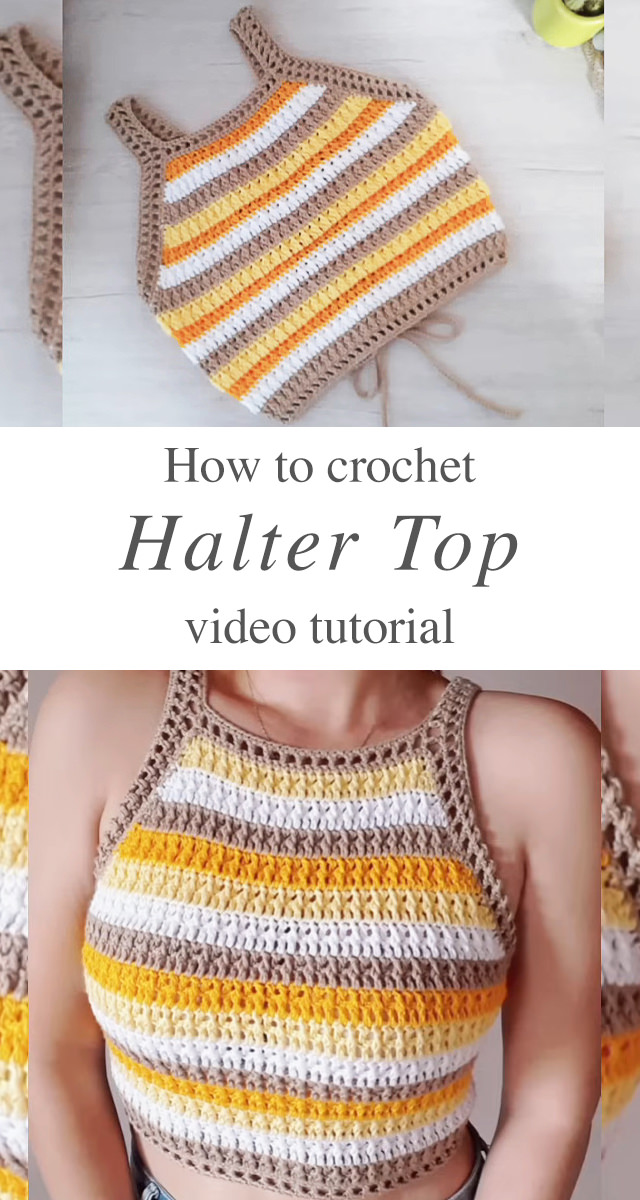
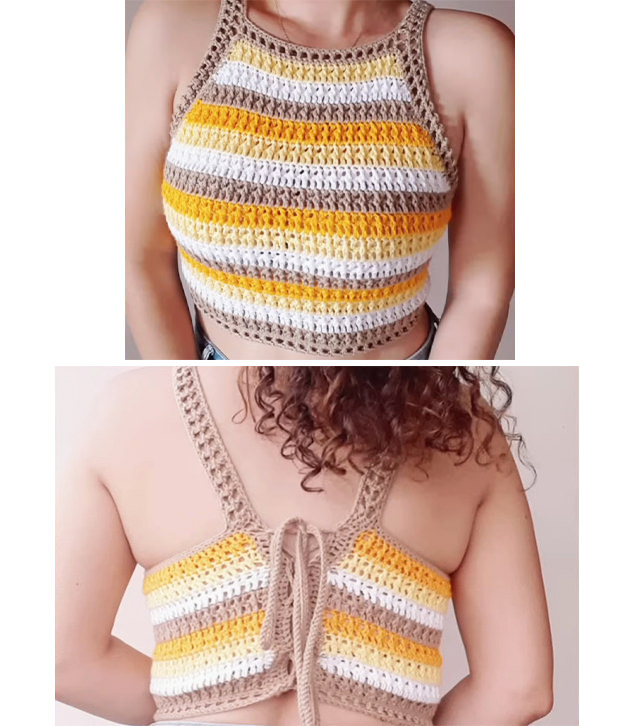
The yarn you select isn’t just about texture—it sets the entire mood of your halter top. For a breezy and comfy fit, opt for 100% cotton yarn or a soft cotton blend. Cotton is breathable, durable, and washes beautifully—perfect for warm weather wear. The featured design in the video tutorial showcases a delightful mix of earthy beige, sunny yellow, burnt orange, and clean white. This warm, striped palette feels like golden hour on a beach. Of course, the beauty of making your own crochet halter top is the freedom to personalize. Don’t shy away from pastels, monochrome, or bold jewel tones depending on your wardrobe and personality. A medium weight (Category 3 or 4) yarn works best for achieving the right balance between coverage and airflow. You’ll also need a 3.5 mm crochet hook or a little bigger, depending on your tension and the yarn label’s recommendation. Don’t forget scissors, a yarn needle for weaving in ends, and stitch markers to help with shaping and strap placement. Optional but helpful additions include a measuring tape and a blocking mat to finish your top with a professional touch. These simple tools and fibers come together to make a stunning, functional piece you’ll love wearing all summer long.
Get lovely tutorials daily!
Subscribe Now
to receive daily crochet and knit tutorials.
Getting the Right Fit
Before diving hook-first into your project, take accurate measurements. Focus on three key areas:
- Bust circumference
- Torso length (from top of shoulder to desired crop level)
- Strap length (from neckline to back)
This halter top design features a slightly high neckline and a close fit under the arms, giving it a flattering and secure structure. It’s essential to customize the width and height of the foundation rows according to your bust size. If you’re unsure, use a measuring tape across your front chest (from one underarm to the other), then add 1–2 inches for ease.
Step-by-Step Crochet Halter Top
The beauty of this particular crochet halter top is its simplicity. You don’t need years of experience to pull it off—just a basic understanding of stitches and some patience.
- Foundation Chain
Start by chaining enough stitches to cover the width of the chest area (usually around 50–60 chains for a medium size, depending on your gauge). Always chain in multiples of 2 to keep the pattern balanced. - Body Rows
The main body uses double crochet (dc) stitches, stacked row by row to create a light, airy fabric. Alternate colors every 2 or 3 rows for that striped look. You can follow the tutorial’s exact sequence for a fun 70s vibe. - Shaping the Top
Once you reach the top third of your halter, it’s time to shape the neckline. This is done by decreasing at the beginning and end of each row, creating a gradual inward slope that will form the halter’s upper triangle. - Adding the Edging and Straps
Using single crochets or slip stitches, add a clean edge around the halter. Then, chain the straps and tie-backs. The tutorial suggests making ties at the back and neck for an adjustable, snug fit—perfect for all body types. - Finishing Touches
Weave in loose ends carefully. Blocking isn’t mandatory with cotton yarn, but a gentle steam block can help your top lay flatter and the stitches pop beautifully.
Styling Your Crochet Halter Top
This little wonder isn’t just for beach days—though it certainly shines there. Pair it with high-waisted jeans, floaty skirts, or denim shorts for a chic festival-ready look. For a layered boho aesthetic, throw on a long kimono or crochet cardigan.
The open stitchwork gives it that carefree charm while still offering enough coverage. Add layered necklaces, round sunnies, and you’ve got yourself an outfit that looks straight out of a summer fashion editorial.
Tips for Beginners
- Swatch first. A quick 4×4” swatch in your chosen stitch and yarn helps determine how many stitches per inch you’re working with.
- Use stitch markers when shaping the neckline. It makes counting decreases a breeze.
- Keep your tension consistent. Tight stitches make the top stiff, while loose ones risk gaping.
- Watch the tutorial at 0.75x speed if you’re a visual learner—it helps catch those intricate steps with clarity.
- Customize, always. Want a longer version? Add rows. Prefer a lower neckline? Adjust the triangle shaping. This project is fully modifiable.
Lightweight enough for travel, trendy enough for Instagram, and timeless enough to wear year after year—this top checks all the boxes. Plus, it makes an unforgettable handmade gift if you’re feeling generous.
So grab your hook, select your colors, and follow along with the video tutorial. Your next favorite summer top is just a few rows away.
Follow CrochetBeja on your favorite social media sites: Facebook, Pinterest, Youtube , Instagram and subscribe for the Newsletter so you don’t miss a thing!
Tutorial and photos of this crochet halter top by: manos de crochet.


Olivia
Where is the actual pattern?????