If you’re searching for a crochet pattern that delivers movement, texture, and a little bit of flair—look no further than the crochet zig zag stitch.

The Crochet Zig Zag Stitch
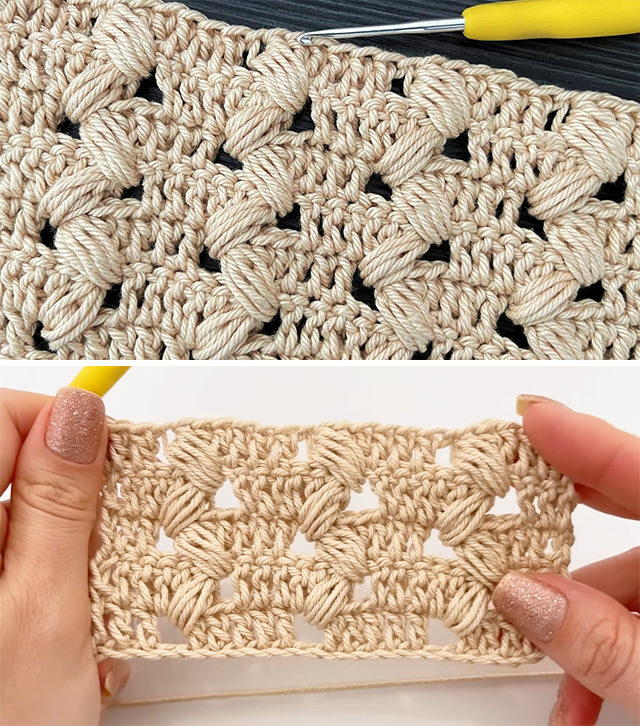
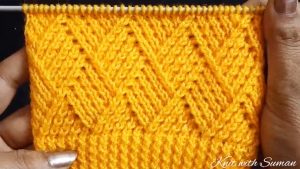
The crochet zig zag stitch, also known as the chevron stitch in some circles, is a classic technique that creates a dynamic, wave-like pattern. The rise and fall of the stitch mimic the peaks and valleys of a mountain range, which adds a visually exciting element to any project. Unlike flat, repetitive patterns, the zig zag stitch offers both structure and flexibility. It’s eye-catching without being overbearing, and it looks just as stunning in a solid color as it does in multi-tone yarns or color blocks. The texture has a raised, almost puffed element that gives it a unique depth and tactile quality.
Stitches Related Posts:
Related Posts
This visually captivating stitch is perfect for blankets, scarves, pillow covers, and even garments. It’s the kind of stitch that looks intricate, but once you get the rhythm, it flows effortlessly from your hook. Whether you’re a confident beginner or a seasoned yarn whisperer, this stitch will earn a permanent spot in your creative toolkit.

Materials You’ll Need
To get started with the crochet zig zag stitch, you’ll need a few essential tools and materials. A medium weight yarn (such as worsted weight) is ideal, offering both structure and definition—cotton or acrylic work beautifully depending on your project. Pair your yarn with a 2.5mm crochet hook, though you can adjust the size based on your tension and desired texture. Keep scissors and a tapestry needle on hand for trimming and weaving in ends, and use a measuring tape to help plan your initial chain length accurately. Since the zig zag pattern typically requires a starting chain in multiples of 12 plus 3, having all your tools ready ensures a smooth and enjoyable stitching experience.
Get lovely tutorials daily!
Subscribe Now
to receive daily crochet and knit tutorials.
Understanding the Anatomy
At its core, the crochet zig zag stitch is all about balance: you create peaks by stitching multiple double crochets into the same space, and valleys by skipping stitches or working decreases.
Here’s the breakdown of the visual flow:
- Peaks (Increases): Often made with 3 double crochets in one stitch. This pushes the fabric upward.
- Valleys (Decreases): Created by working 3 stitches together. This pulls the fabric downward.
- Straight Edges: Maintained by adjusting the turning chain and keeping the stitch count in check.
This dance between increases and decreases gives the fabric its characteristic ripple or zig zag shape. The bold puff stitches demonstrated in the video tutorial add extra body and softness to the structure, creating a cushion-like surface that’s both cozy and elegant.
How to Crochet Zig Zag Stitch
- Foundation Row: Begin by chaining a multiple of 12 plus 3 extra chains for the turning stitch. This ensures your work maintains the correct number of peaks and valleys.
- Row 1: Establishing the Zig Zag Double crochet into the 4th chain from the hook, then double crochet into the next 2 stitches. Now you’ve got your first slope. Next, work 3 double crochets together (dc3tog) to form the valley. Continue with 3 double crochets in the next stitch (your peak). Repeat across the row, alternating valleys and peaks. End with 4 double crochets to form the last slope.
- Row 2 and Beyond: Turn your work and chain 3 (counts as first dc). Follow the same pattern: build up with multiple double crochets in one stitch for peaks, decrease for valleys, and always finish cleanly on the edge to keep your rows even.
Optional Puff Pop Accents If you want the plush texture shown in the image above, you can work puff stitches into the center of each peak row after establishing your base. These add volume and artistry to the overall look.
Creative Ways to Use the Zig Zag Stitch
The crochet zig zag stitch is incredibly versatile. Here are some inspired ways to use it:
- Baby Blankets: The soft undulations are comforting for little ones.
- Throws and Afghans: Showcase the movement by alternating stripes in bold colors.
- Pillows: Use puffed zig zag panels on the front of a cushion for a 3D effect.
- Wearables: Scarves, shawls, and even cardigans look amazing in a zig zag stitch, adding texture without overcomplicating the design.
You can play with the height of the peaks, the distance between them, and even insert openwork rows (like mesh or chain gaps) to vary the density.
Expert Tips
- Count Your Stitches Religiously: This stitch pattern relies on mathematical precision. One missed stitch can throw off the whole zig zag.
- Block Your Work: Blocking helps define the zig zag points and smooths out any tension irregularities.
- Use Stitch Markers: Place them at the beginning of each peak and valley to track your increases and decreases.
- Practice with Swatches: Before jumping into a large project, try a small swatch to get familiar with the rhythm and tension.
And here’s a golden nugget—crochet zig zag stitch is not limited to double crochets. You can experiment with half double, treble, or even Tunisian stitches for variations on the theme.
The crochet zig zag stitch is a crowd-pleaser for good reason. It brings drama, flow, and style to your handmade creations. With its dynamic structure and easy-to-learn formula, it opens up a world of artistic possibility—especially when combined with texture-enhancing techniques like puff stitches or color gradation.
So grab your hook, pick your yarn, and give your next project the energy it deserves. Once you master the zig zag rhythm, you’ll find yourself reaching for this pattern again and again.
Follow CrochetBeja on your favorite social media sites: Facebook, Pinterest, Youtube , Instagram and subscribe for the Newsletter so you don’t miss a thing!
Tutorial and photos of this crochet zig zag stitch by: Crochet Stitches Art of Love.


Leave a Reply