Few projects capture the charm of handmade beauty quite like a crochet throw blanket. Add to that a delicate rose edging, and you’ve got yourself a showstopper — both functional and decorative.
The Beauty Behind the Crochet Throw Blanket
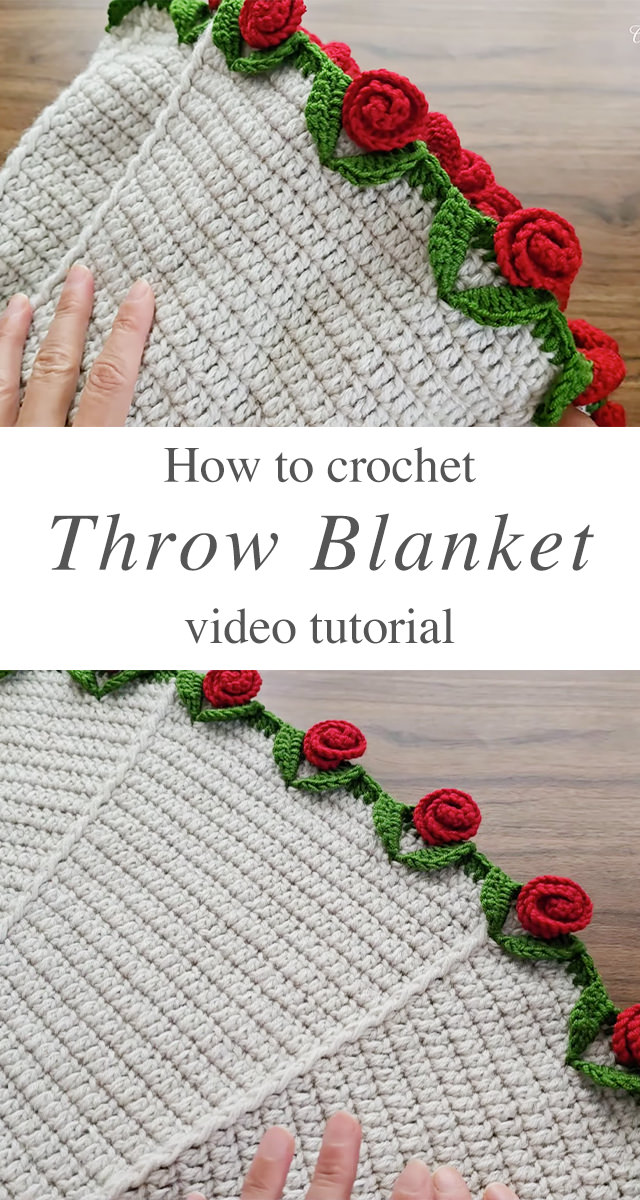
A crochet throw blanket isn’t just a cozy accessory — it’s a symbol of warmth, care, and time invested. Lightweight yet insulating, throw blankets are perfect for draping over sofas, armchairs, or even the end of a bed. But when you pair it with rose edging, you introduce a layer of intricate artistry that gives it a romantic, heirloom-worthy feel. What sets this particular design apart is the combination of simple body stitches with a dramatic, textured border. The clean base allows the roses to shine, quite literally like a garland of red blooms dancing across green vines.
Blankets Related Posts:
Related Posts
Inspired by this delightful rose-edged blanket tutorial below, we’ll walk you through everything you need to know about crafting your own crochet throw blanket with rose edging — from yarn selection to final stitch. Let’s wrap up in warmth and style.
Materials
The success of your crochet throw blanket begins with material choices. In the video tutorial, a neutral beige yarn forms the base — an excellent choice for making the rose trim pop. Recommended yarn for the main body is a medium-weight (worsted or aran) yarn in soft acrylic, cotton, or a blend. Beige, cream, or soft grey work beautifully. For the edging use vibrant red yarn for the roses and a rich green for the leafy vine base. Choose a yarn with good stitch definition to bring out the spiral shape of the roses. Generally, a 4.5 mm crochet hook works well with worsted yarn, but always check the yarn label. For a softer drape, go a half size up. You’ll need a tapestry needle for weaving ends, scissors, and stitch markers (optional) for marking edging placement.
Get lovely tutorials daily!
Subscribe Now
to receive daily crochet and knit tutorials.
Crafting the Base: Rows of Comfort
The body of the throw blanket in the tutorial is crafted using rows of simple crochet stitches — most likely double crochet (dc) in U.S. terms. The stitch pattern is dense yet flexible, providing enough weight for warmth without being too bulky.
Start by chaining your desired width (typically 120–150 chains for a standard throw). Work in rows using your chosen stitch until your piece reaches the desired length (usually around 50–60 inches).
A gentle tip: count your stitches regularly to avoid gradual slanting or narrowing. Blocking the finished piece before attaching the edging will also help even out any imperfections.
Creating the Rose Edging: Petals and Vines
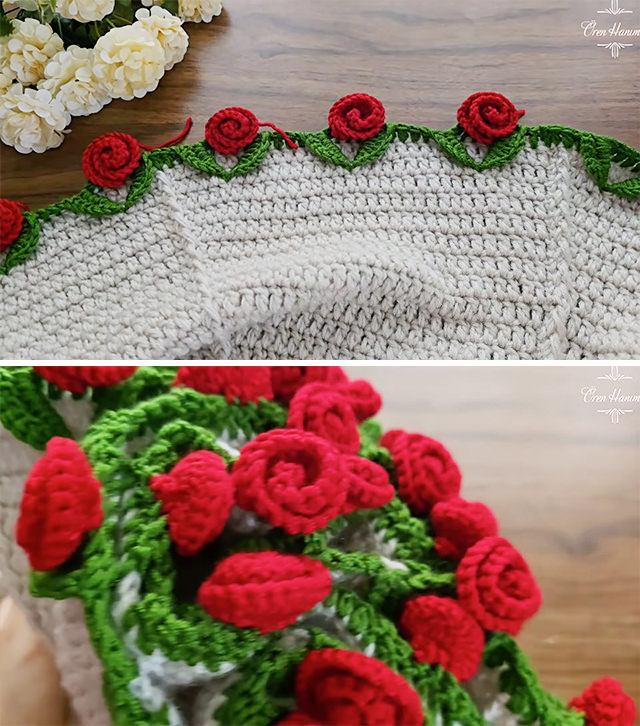
Now comes the magic — the rose edging. This whimsical addition transforms a standard crochet throw blanket into a blossoming masterpiece.
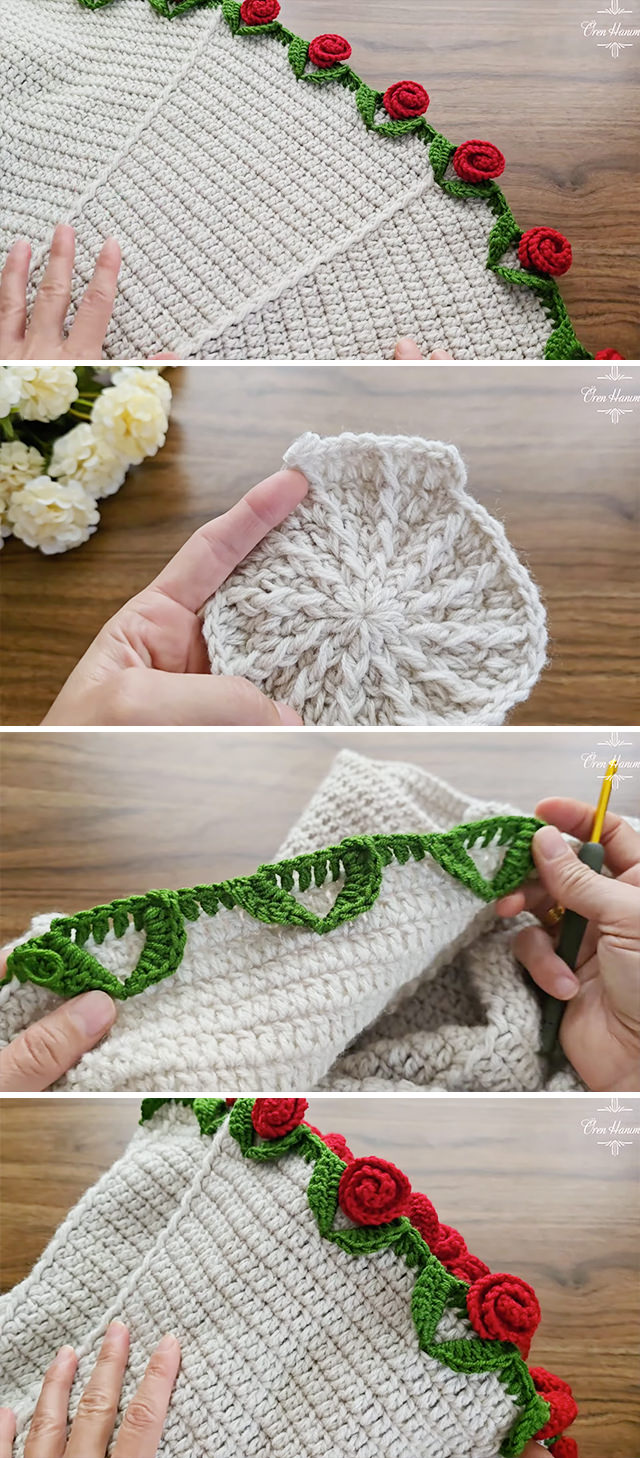
- Step 1: The Vine Border
First, create a green chain long enough to wrap around the edges of your blanket. Using single crochets, build up a base that resembles a twisting vine. Incorporate small leaves along the chain for added texture — these can be made using simple chain-picot combinations. - Step 2: Crochet the Roses
The roses are made by crocheting a long strip of half-double crochet stitches, then rolling the strip into a spiral to form the bloom. Sew the base of each rose securely to hold its shape. These roses are then sewn or crocheted onto the vine at regular intervals — ideally at each corner and evenly along the sides. - Step 3: Attach the Edging
You can sew the vine border directly onto the blanket using a whip stitch or crochet it into the edge with a slip stitch. The video shows the creator positioning each flower carefully to ensure symmetry, so take your time with placement.
Tips for Crochet Throw Blanket
- Weave ends as you go. With multiple color changes, it’s wise to tidy up tails after each section.
- Use blocking to shape. Light steam or wet blocking can help set the stitches and even out your roses.
- Customize the colors. Try a pastel theme for spring vibes or rich jewel tones for a luxurious look.
- Secure the roses well. Since they’re 3D and could snag, use tight stitching and reinforce them underneath.
Styling and Gifting Ideas
A crochet throw blanket with rose edging is versatile — toss it over a chair for a vintage look, use it as a bed accent, or take it along for a cozy picnic. It’s also an incredibly thoughtful gift. Imagine presenting it at a bridal shower, baby arrival, or housewarming party. Handmade items carry heartfelt value, and this blanket radiates that in every stitch.
Pair it with a matching cushion or a simple rose-shaped sachet for an extra-special touch. You can also make smaller lap versions for nursing homes or hospital donations — a comforting gesture wrapped in beauty.
This crochet throw blanket isn’t just a craft — it’s a celebration of texture, color, and comfort. The rose edging adds an elegant flourish that feels straight out of an enchanted garden. Whether you’re an experienced crocheter or a brave beginner, this project invites you to slow down, loop by loop, and create something unforgettable.
The joy of crochet is that you leave a little love in every stitch — and with this blooming beauty, you leave a trail of roses too.
Follow CrochetBeja on your favorite social media sites: Facebook, Pinterest, Youtube , Instagram and subscribe for the Newsletter so you don’t miss a thing!
Tutorial and photos of this crochet throw blanket by: Ören Hanım.


Leave a Reply