A flower crochet basket is a delightful and functional piece that adds a touch of handmade charm to any space.
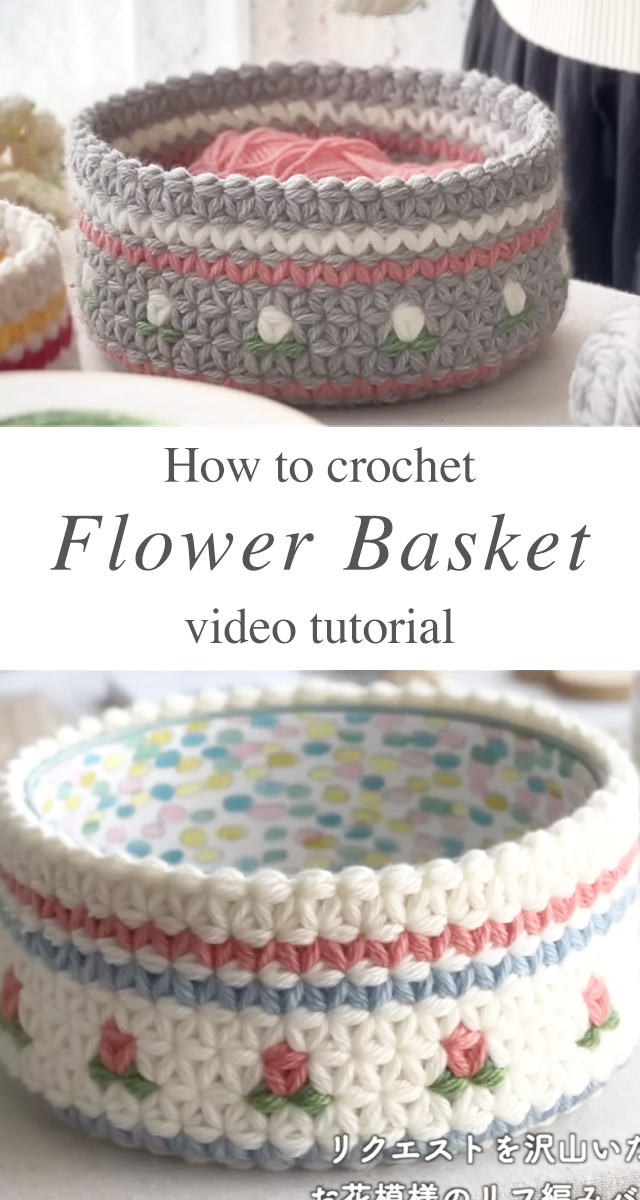
THE FLOWER CROCHET BASKET
Creating a flower crochet basket is a fulfilling project that blends beauty with practicality. Whether you’re looking to store small items, use it as a decorative centerpiece, or gift it to a loved one, this project is both rewarding and practical. The beauty of crochet lies in its versatility, allowing you to experiment with stitches, textures, and designs to match your personal aesthetic. With each stitch, you’re not only crafting a functional piece but also adding a little bit of artistry to your everyday surroundings.
Baskets Related Posts:
Related Posts
In this guide, we’ll take you through the process of making a stunning flower crochet basket, inspired by the tutorial in the video below.
Materials You Will Need
Before diving into crocheting, ensure you have the right materials. Using high-quality yarn and tools will make the process easier and the final product more durable. You will need cotton yarn for structure and durability—choose soft pastels for a vintage feel or bold hues for a modern look. A crochet hook size 3.0 mm works best for a sturdy basket. Have a sharp pair of scissors for clean cuts, a tapestry needle for weaving in ends, and stitch markers to help track rounds. Additionally, you can use a plastic or wooden base for extra stability.

Get lovely tutorials daily!
Subscribe Now
to receive daily crochet and knit tutorials.
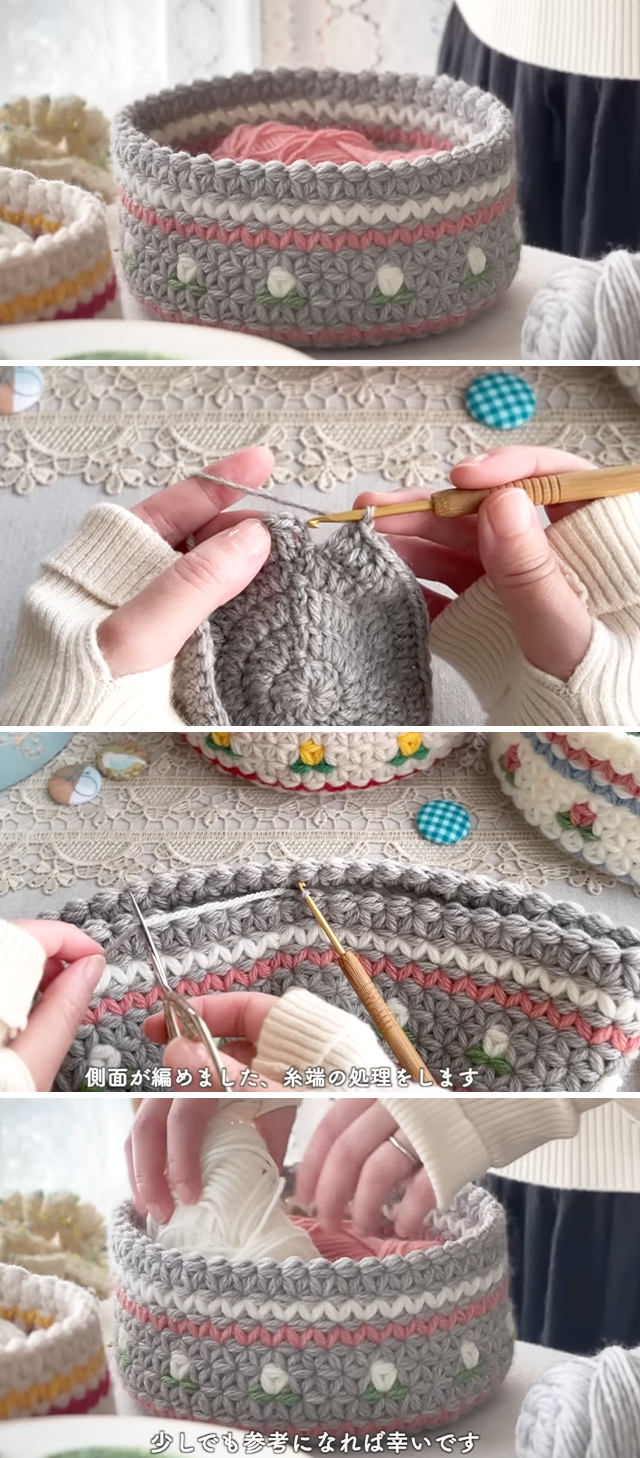
Step 1: Creating the Basket Base
Start with a magic ring, a foundational crochet technique that ensures a tight and seamless beginning.
- Magic Ring & Single Crochet: Create a magic ring and work six single crochets into it.
- Increase Rounds: Continue working in rounds, increasing each round to expand the base.
- Final Base Size: Stop increasing when your base reaches the desired diameter (typically 6-8 inches).
For a firmer base, consider crocheting over a pre-cut plastic or wooden disc.
Step 2: Building the Basket Sides
Once the base is complete, transition into creating the basket’s height.
- Work in the Back Loops Only: This technique creates a crisp edge and separates the base from the sides.
- Establish Height: Continue crocheting in rounds without increasing. Typically, 10-15 rounds create a well-sized basket.
- Tension & Structure: Keep your tension consistent for a uniform look.
Step 3: Adding the Floral Design
A flower crochet basket wouldn’t be complete without decorative floral accents. These can be added in various ways:
- Embroidered Crochet Flowers
- Using a tapestry needle, stitch small flowers onto the basket. French knots and lazy daisy stitches work beautifully.
Step 4: Adding the Finishing Touches
A well-finished basket stands out. Here’s how you can enhance yours:
- Border Detailing: A scalloped edge adds a delicate touch.
- Handles: Create two small loops for easy carrying.
- Blocking: Gently steam or shape your basket for a refined look.
Creative Uses for Flower Crochet Basket
Once your basket is complete, put it to good use!
- Storage: Organize yarn, cosmetics, or stationery.
- Gifting: Fill it with goodies for a thoughtful present.
- Decor: Place it on shelves or tables for a cozy, handmade touch.
Creating a flower crochet basket is a fulfilling project that blends beauty with practicality. Whether you’re a seasoned crocheter or a beginner, this guide ensures a smooth experience. Try different color combinations and flower patterns to make it uniquely yours!
Follow CrochetBeja on your favorite social media sites: Facebook, Pinterest, Youtube , Instagram and subscribe for the Newsletter so you don’t miss a thing!
Tutorial and photos of this flower crochet basket by: MimosdaMalu.


Gabi Spitzner
Please send me the free crochet pattern for the butterfly basket, in German please! Thanks in advance! LG-Gabi